Installation Guide
Overview
This document is work in progress.
Starting with release 2026.1.1, each component must be installed using its own Ansible Playbook.
Component configurations will also be stored in their own inventory files.
This improvement will provide a deeper understanding of how components interact within the SIP3 solution and offer greater flexibility and expanded configuration options for your projects.
|
SIP3 leverages a traditional microservice architecture that makes it easy to scale, in the cloud and on-premise.
Having each one of the SIP3 components deployed independently saves you money, time and resources, but it also brings a layer of extra complexity to the deployment process.
To make your life easier the SIP3 team introduced the sip3-ansible Github project.
At the moment you can use sip3-ansible to deploy each of the SIP3 components as a service to CentOS, Debian or as a docker container to any Linux OS.
Please, contact the SIP3 team if you need help with specific environment.
|
By following the traditional Ansible approach, you will be creating an inventory file that describes the SIP3 installation process. By doing so, you will be able to quickly deploy your project to any infrastructure, regardless of the size and amount of its traffic.
The sip3-ansible project requires Ansible version 2.10 or higher.
|
Basic Installation
In the following section we will deploy SIP3 to a simple VoIP network, consisting of one PBX server, as shown on the diagram below. In the beginning SIP3 Captain will be installed as an agent to the same server. Afterwards, all the SIP3 backend components will be installed to another server as a monolithic application.
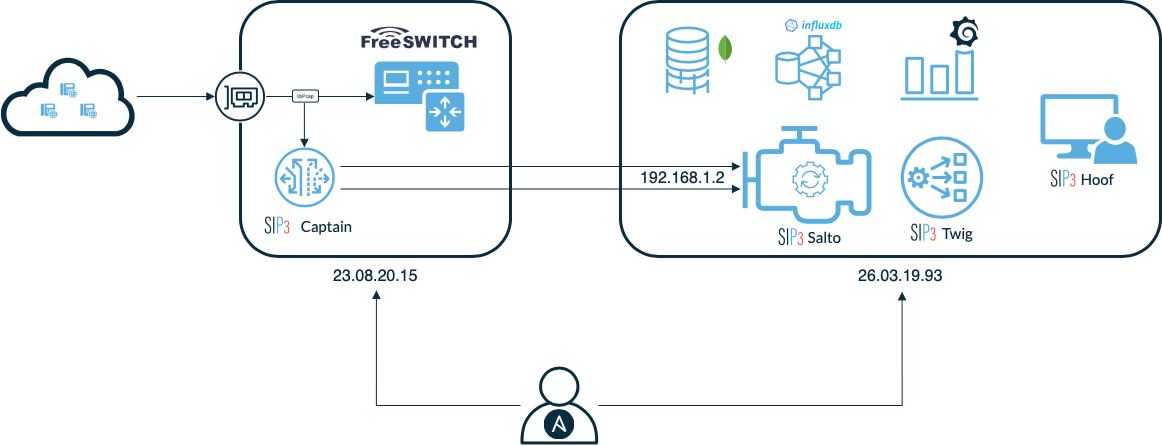
Installing SIP3 Captain To Single PBX
Clone sip3-ansible repository and checkout the latest release branch:
git clone https://github.com/sip3io/sip3-ansible.git
git checkout -b release/2026.1.1
Create a sip3-captain.yml file inside the inventories directory:
all:
  hosts:
    captain:
      ansible_host: 23.08.20.15                       (1)
  vars:
    ansible_user: root
    ansible_port: 22
    ansible_become: true

    edition: ce                                       (2)

    features:                                         (3)
      - rtcp

    captain:
      pcap:                                           (4)
        dev: eth0
        bpf_filter: udp
      sender:                                         (5)
        uri: udp://192.168.1.2:15060
      management:                                     (6)
        uri: udp://192.168.1.2:15090
      metrics:
        logging:
          step: 5000
Let’s take a closer look at the inventory file:
| 1 | SSH address. Ansible uses it to connect to the PBX via SSH. |
| 2 | Component edition. |
| 3 | Features help to customize SIP3 behaviour and enable/disable certain functionality. They also help to separate CE and EE configuration. You can find more information in the corresponding section of this document. |
| 4 | Standard libpcap settings.
Specify on which interface you want to capture VoIP traffic and set BPF filter to avoid capturing all the packets (e.g. If you want to capture only SIP protocol on port 5060 use udp and port 5060 as a filter). |
| 5 | SIP3 Salto data interface. SIP3 Captain uses this interface to send application data. |
| 6 | Management interface.
Must be defined if rtp or rtcp features enabled.
SIP3 Salto and Captain use this interface to exchange SDP information. |
Our minimalistic SIP3 Captain configuration is ready. Now, let’s install SIP3 Captain to the PBX using the command below:
ansible-playbook -i inventories/sip3-captain.yml playbooks/sip3.ymlOnce Ansible successfully finished with the playbook we can check that SIP3 Captain is actually working.
At the first check bootstrap information from /var/log/sip3-captain/default.log if you deployed SIP3 Captain without Docker or ~/sip3/var/log/sip3-captain/default.log in other case:
05-10-2020 11:36:34.758 [vert.x-eventloop-thread-0] INFO  i.s.captain.ce.capturing.PcapEngine - Listening network interface: eth0
05-10-2020 11:36:34.885 [vert.x-eventloop-thread-1] INFO  io.sip3.captain.ce.sender.Sender - UDP connection opened: udp://192.168.1.2:15060
Now let’s check /var/log/sip3-captain/metrics.log and ~/sip3/var/log/sip3-captain/metrics.log accordingly to get some insights on the amount of traffic captured by SIP3 Captain and to make sure that the traffic goes to the SIP3 Salto:
05-10-2020 12:27:09.298 - packets_captured{name=sip3-captain,source=pcap} throughput=2.4/s
05-10-2020 12:27:09.299 - packets_sent{name=sip3-captain} throughput=1.2/s
Congratulations, SIP3 Captain is up and capturing traffic. So, we can move to the next section of the document.
Installing SIP3 Captain To Multiple PBXs
In the previous section we configured SIP3 Captain for single PBX. However, in real life we usually have multiple VoIP nodes.
Let’s add another PBX to our previous example and define a group of hosts called captain as it’s shown in the example below:
all:
  children:
    captain:
      hosts:
        pbx1:
          ansible_host: 23.08.20.15
        pbx2:
          ansible_host: 29.11.19.88
          captain:                          (1)
            pcap:
              dev: eth1
  vars:
    ansible_user: root
    ansible_port: 22
    ansible_become: true

    edition: ce

    features:
      - rtcp

    captain:
      pcap:
        dev: eth0
        bpf_filter: udp
      sender:
        uri: udp://192.168.1.2:15060
      management:
        uri: udp://192.168.1.2:15090
      metrics:
        logging:
step: 5000| 1 | Each SIP3 Captain instance can be configured separately by re-assigning global variables withing the host section. Re-assigned variables will be merged with the global one accordingly to Ansible precedence convention. |
Now we can use the same command from the previous section to install both SIP3 Captains:
ansible-playbook -i inventories/sip3-captain.yml playbooks/sip3-captain.ymlAs you can see installing multiple SIP3 Captains as easy as installing one.
Installing SIP3 Backend Components
The backend components are:
-
SIP3 Salto - a component for traffic processing and quality metric generation
-
SIP3 Twig - a component providing OpenAPI functionality
-
SIP3 Hoof - a web user interface served via the Nginx HTTP server
-
MongoDB - A document-oriented database that stores information
-
InfluxDB - A time-series database for storing quality metrics
-
Grafana - A server that provides functionality for displaying metrics on user dashboards
Each component must be configured using its own inventory file and installed using its own playbook
Create the following component configuration files in the inventories directory:
sip3-salto.yml, sip3-twig.yml, sip3-hoof.yml, mongodb.yml, and optionally influxdb.yml and grafana.yml.
Commons structure of inventory files
all:
  hosts:
    backend:
      ansible_host: 23.08.20.15                       (1)

  vars:
    ansible_user: root                                (2)
    ansible_port: 22                                  (3)
    ansible_become: true                              (4)
    edition: сe                                       (5)

    salto:                                            (6)
      mode: full

      application:                                    (7)
        config:
          name: sip3-salto
          type: salto
          ...
      vertx_options: |                                (8)
        {
          "metricsOptions": {
            "enabled": false
            ...
      environment: |                                  (9)
        JAVA_HOME=/opt/sip3-java
        ...
      logback: |                                      (10)
        <?xml version="1.0" encoding="UTF-8"?>
        ...
Let’s take a closer look at the inventory file:
| 1 | Server address. Ansible uses it to connect to the SIP3 backend via SSH. |
| 2 | Username Ansible will use to connect to the backend server. |
| 3 | SSH tcp port of backend server. |
| 4 | Configuring Ansible to grant the user privileged rights on connection to the server. |
| 5 | Component edition. |
| 6 | The name of a component in the sip3 solution. It can be one of the following: salto, twig, hoof, mongodb, influxdb, or grafana. |
| 7 | The application configuration section. This section contains the main configuration settings for this component and specifies how it will be deployed on the server. |
| 8 | The Vert.x configuration section. |
| 9 | The environment file configuration section |
| 10 | The logging configuration section |
Now let’s install SIP3 backend a component by running the same simple command:
# MongoDB
ansible-playbook \
  -i ../inventories/mongodb.yml \
  playbooks/mongodb.yml

# Grafana
ansible-playbook \
  -i ../inventories/grafana.yml \
  playbooks/grafana.yml

# InfluxDB
ansible-playbook \
  -i ../inventories/influxdb.yml \
  playbooks/influxdb.yml

# Twig
ansible-playbook \
  -i ../inventories/twig.yml \
  playbooks/twig.yml

# Hoof
ansible-playbook \
  -i ../inventories/hoof.yml \
  playbooks/hoof.yml

# Salto
ansible-playbook \
  -i ../inventories/salto.yml \
  -i ../inventories/codecs.yml \
  playbooks/salto.yml
This document will be updated soon…