How To Build SIP3 Based Solutions or Wangiri Fraud Detection Example
Overview
For the last two years SIP3 has become a mission critical system for many telecom companies of different size and business verticals.
The reason why it happened is very simple. The SIP3 team has been always trying to look beyond the monitoring and troubleshooting challenges. That’s why we strive to help our customers stand out of their competition by finding non-standard ways of solving visibility issues.
This tutorial is based on the real story of one of our customers, and outlines why and how to build SIP3 based solutions.
Use Case
There was an average size VoIP provider who had around 1K Call Attempts per Second (at around 20M Call Attempts per Day). A few months ago those started growing. However, the amount of active clients stayed the same.
With the growing number of Call Attempts this provider had to choose either to buy more licenses from their VoIP hardware and software vendor, or to introduce throttling policies for some of their clients.
In addition, the provider started noticing more and more Wangiri (Autodialers) fraud activities while troubleshooting support tickets.
That was the moment when they came to the SIP3 team and asked if we can find all the Wangiri (Autodialers) clients and estimate their presence within the network.
Let’s see how did we do that.
Solution
All the SIP3 solutions are based on User-Defined Functions. In our use case, the best function to use is sip_call_udf.
If you think about it sip_call_udf is nothing else but a real-time CDR which can be used to build subscriber profiles for further analysis.
Let’s take a closer look at a schema of our solution:
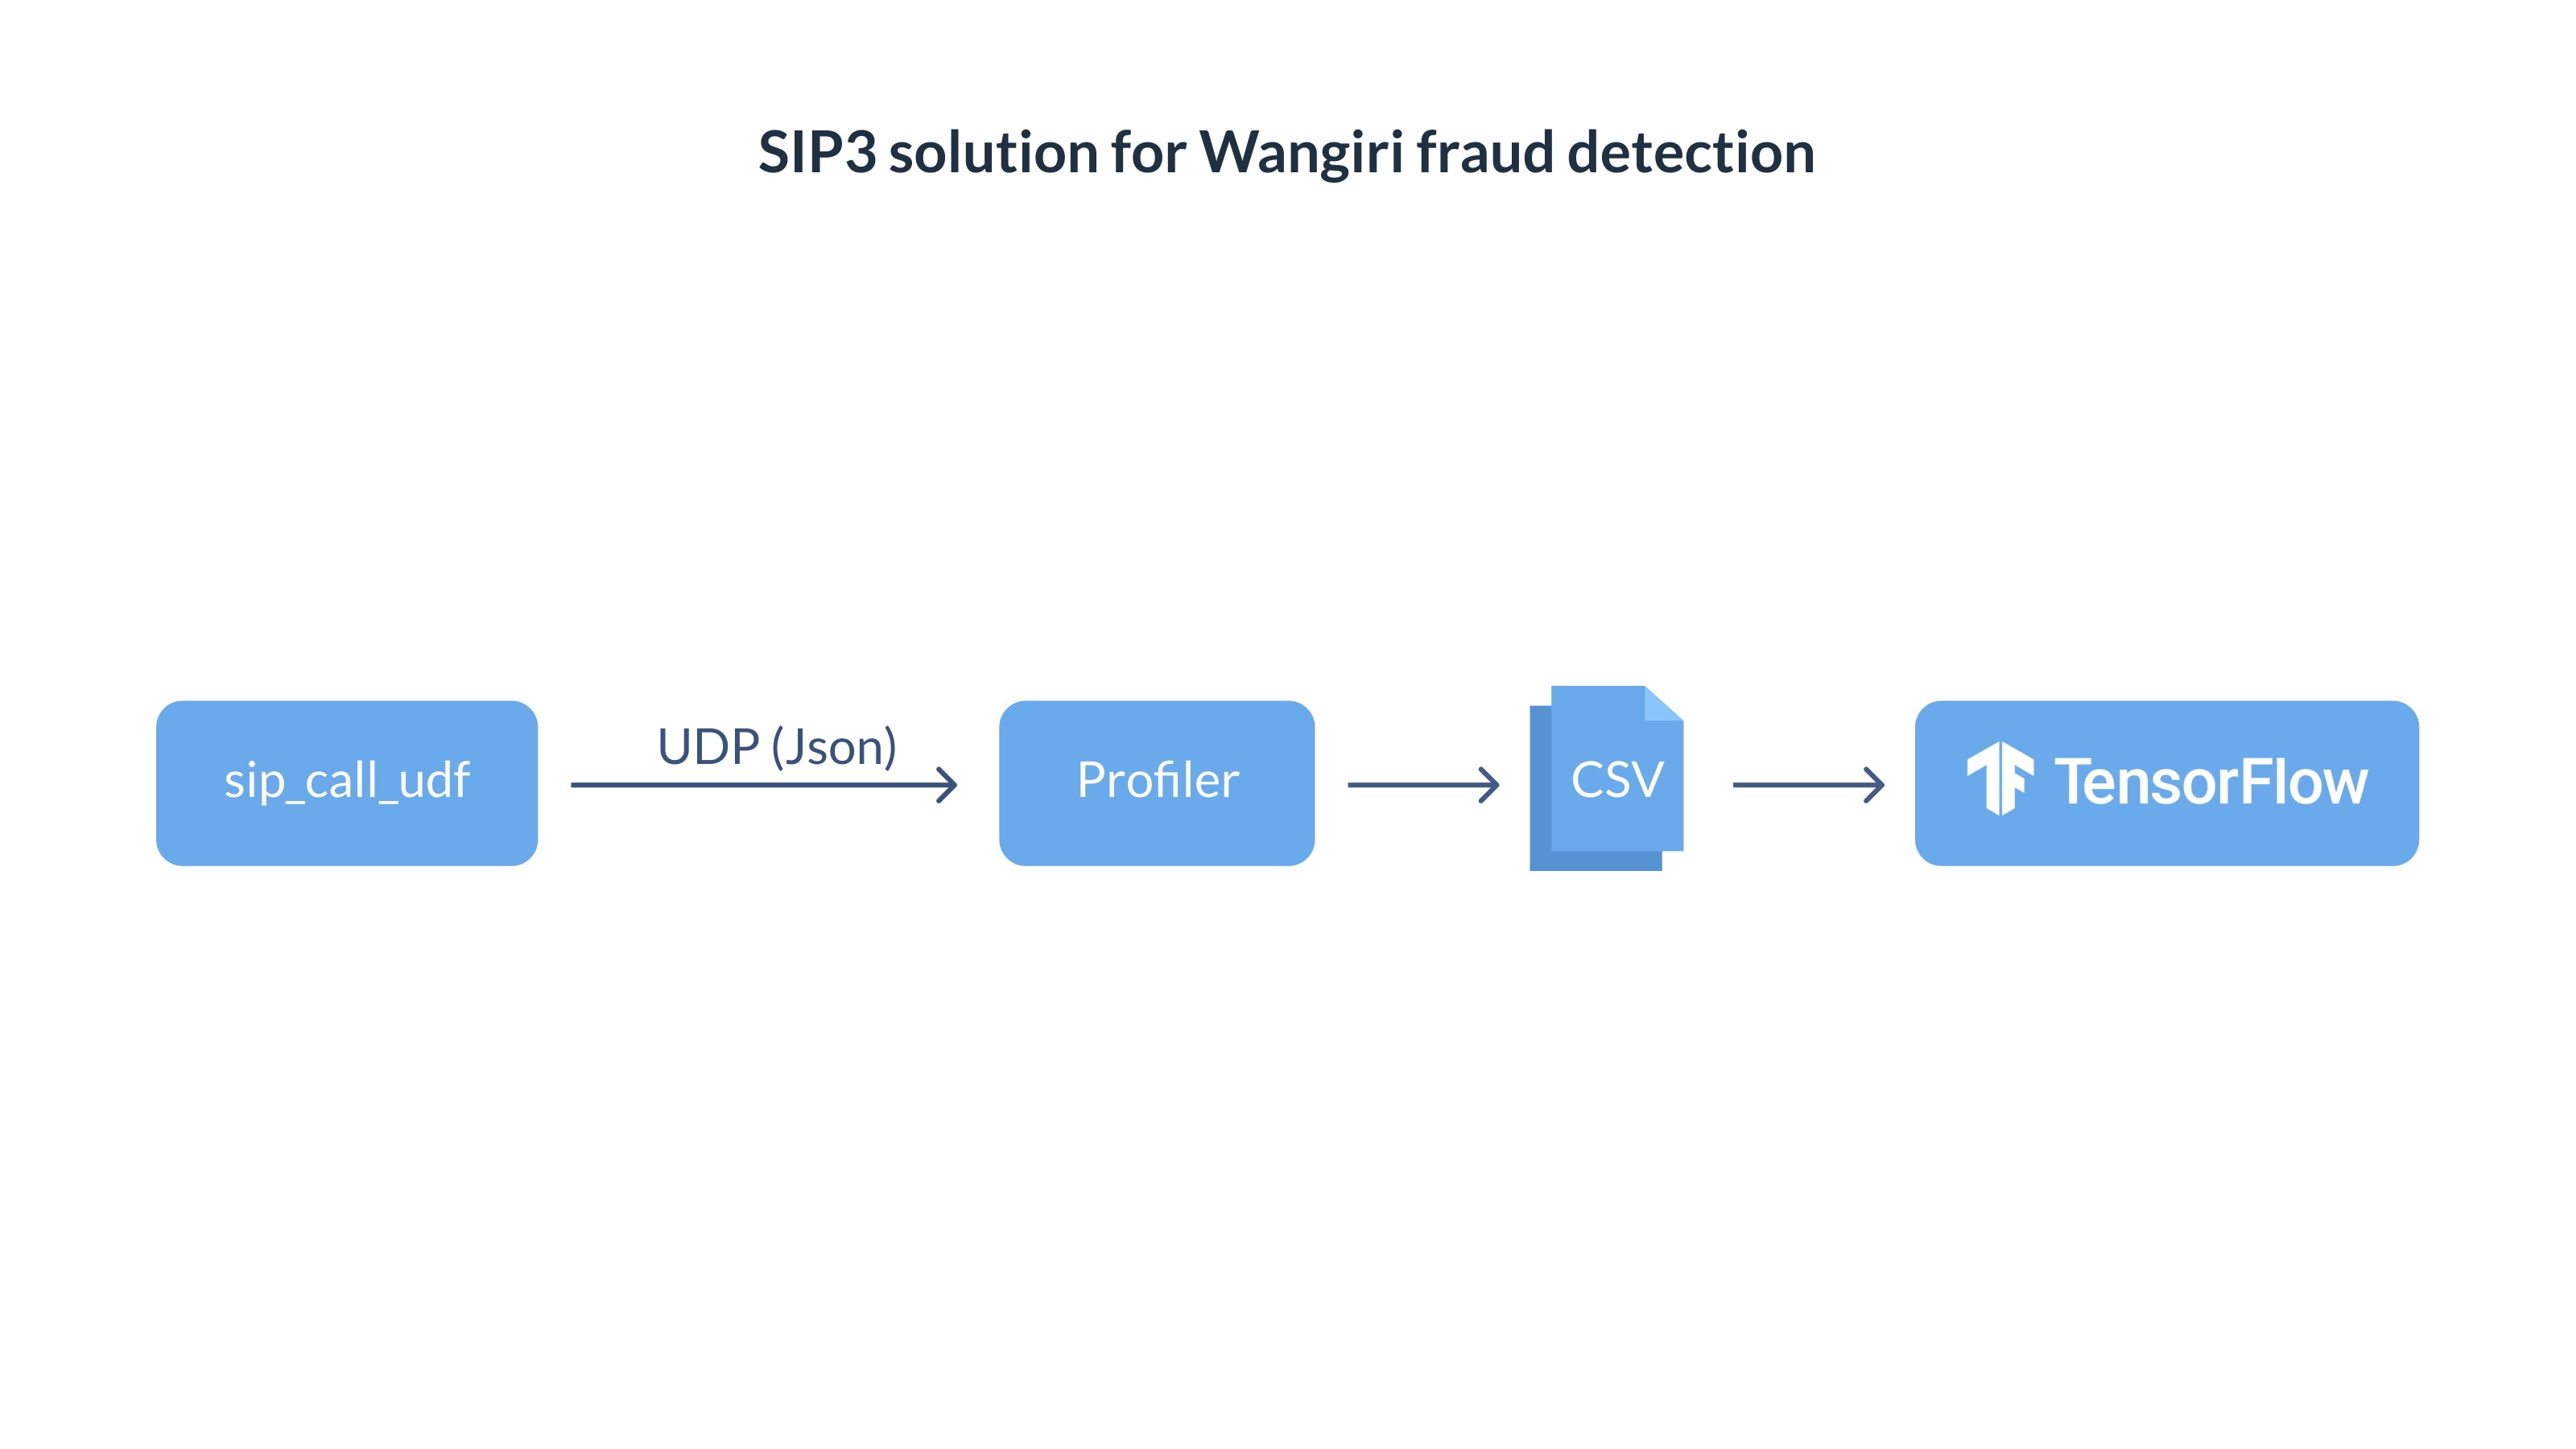
| 1 | A very important moment is that we won’t be implementing entire solution within the sip_call_udf, but will send all the real-time CDRs as a Json via UDP socket. With this approach we don’t need to touch the SIP3 business logic every time when we want to adjust subscriber profiles data. |
| 2 | Another good thing is that Profiler is just a UDP server with little business logic. It could be implemented not only in Groovy and JS, but in any language popular among of your team. |
| 3 | CSV is a clean and simple format integrated into most of the popular ML engines. That’s why we recommend using it while prototyping. |
| 4 | Once CSV files are analyzed and all profile patterns are defined, you can train a TenserFlow model and integrate it back in your system. |
Now that the schema has been defined we can move forward with the implementation details.
User-Defined Function
As we discussed in the previous section sip_call_udf will be used only to send CDRs as a Json via UDP socket. With the power of the Vert.x Framework it can be implemented in less than 10 lines of code (excluding blank lines and comments):
package udf

import io.vertx.core.AbstractVerticle
import io.vertx.core.json.Json

class SipCallUdfHandler extends AbstractVerticle {

    def udp = vertx.createDatagramSocket()                          (1)

    @Override
    void start() throws Exception {
        vertx.eventBus().localConsumer("sip_call_udf") { event ->
            // `event.body` is a Map<String, Object>:
            // {
            //  "src_addr" : String,
            //  "src_host" : String (Optional),
            //  "src_port" : Integer,
            //  "dst_addr" : String,
            //  "dst_host" : String (Optional),
            //  "dst_port" : Integer,
            //  "payload" : Map<String, Object>,
            //      "created_at" : Long,
            //      "terminated_at" : Long,
            //      "state" : String,
            //      "caller" : String,
            //      "callee" : String,
            //      "call_id" : String,
            //      "duration" : Long (Optional),
            //      "setup_time" : Long (Optional),
            //      "establish_time" : Long (Optional),
            //      "terminated_by" : String(Optional),
            //   "attributes" : Map<String, String|Boolean>
            // }
            def session = event.body()                              (2)

            def buffer = Json.encodeToBuffer(session)               (3)

            udp.send(buffer, 15080, "127.0.0.1") {}                 (4)

            event.reply(true)                                       (5)
        }
    }
}| 1 | Create UDP socket. |
| 2 | Retrieve a CDR. |
| 3 | Encode it as a Json. |
| 4 | Send it via UDP. |
| 5 | Return control back to SIP3. |
You can use the code snippet above in your own SIP3 solution. If you are looking for a way to send data to various databases, message brokers or HTTP webhooks check out the Vert.x Documentation.
Profiler
We will skip the part of UDP server implementation because you can easily find an example of it in any programming language in the Internet.
To start with, we will define a set of features we will use to certainly detect Wangiri (Autodialers) profiles:
class Profile {

    val outgoingCallStats = CallStats()
    val incomingCallStats = CallStats()

    class CallStats {

        var totalCalls = 0                                          (1)

        var totalDuration = 0                                       (2)
        var chargedMinutes = 0

        var failedCalls = 0                                         (3)
        var canceledCalls = 0
        var answeredCalls = 0

        var terminatedCalls = 0                                     (4)
        var threeSecondsCalls = 0
    }
}| 1 | totalCalls is a feature which helps to estimate subscriber’s presence within the network. |
| 2 | totalDuration and chargedMinutes facilitates the calculation of an average price of call attempt. |
| 3 | failedCalls, canceledCalls and answeredCalls show the quality of the dialing lists. |
| 4 | terminatedCalls and threeSecondsCalls are the main features reflecting Wangiri (Autodialers) behaviour. |
Have a look at the example of Profiler implementation in Kotlin:
fun handleCdr(msisdn: String, callType: String, cdr: JsonObject) {
    val newTimeSuffix = timeSuffix.format(System.currentTimeMillis())
    if (currentTimeSuffix < newTimeSuffix) {
        currentTimeSuffix = newTimeSuffix
    }

    val profile = profiles.getOrPut(currentTimeSuffix) { mutableMapOf() }.getOrPut(msisdn) { Profile() }

    val callStats = when (callType) {
        CallType.OUTGOING -> profile.outgoingCallStats
        else -> profile.incomingCallStats
    }

    callStats.apply {
        val duration = cdr.getInteger("duration")?.let { it / 1000 }

        totalCalls++
        duration?.let { duration ->
            totalDuration += duration

            if (duration < 3) {
                threeSecondsCalls++
            } else {
                chargedMinutes += (duration / 60) + 1
            }
        }

        when (cdr.getString("state")) {
            "failed" -> failedCalls++
            "canceled" -> canceledCalls++
            "answered" -> answeredCalls++
        }

        when (callType) {
            CallType.OUTGOING -> if (cdr.getString("terminated_by") == "caller") terminatedCalls++
            CallType.INCOMING -> if (cdr.getString("terminated_by") == "callee") terminatedCalls++
        }
    }
}
Once the subscriber profiles are ready we can load them in CSV files and perform the analysis.
Basic Analysis
Below is the result we got from our VoIP provider - statistic of outgoing calls sorted by the amount of call attempts:

As you can see those profiles clearly don’t belong to Wangiri (Autodialers). After a few minutes of debugging with SIP3 we figured out that the growing amount of Call Attempts was caused by UAC misconfigurations.
We notified the VoIP provider and their problem with hardware and software capacity got resolved. However, we were still curious to find out if it’s possible to detect Wangiti (Autodialers) profiles.
Let’s look at the same statistics of outgoing calls but this time sorted by the amount of calls shorter than 3 seconds:

It seems that we’ve got a clear pattern of Wangiri (Autodialers) profiles. The majority of calls are cancelled while the rest lasted less than 3 seconds and got terminated by the caller.
All left to do is to train and integrate a TenserFlow model.